Friday, May 29, 2015

How to Execute multiple SQL queries using tMysqlRow component in Talend !!

In this post I will show you how to execute multiple SQL queries using tMysqlRow component.

Drag and drop the following components from the palette tMysqlConnection , tMysqlRow , tMysqlCommit.

How to do connect each component:--

Right click on tMysqlConnection and select Trigger > OnSubjobOk and drag a line o the tMysqlRow component .
Right click on tMysqlRow and select Trigger > OnSubjobOk and drag a line o the tMysqlCommit component .

Open the component properties of tMysqlConnection .

We have to set the additional JDBC parameters to allow multiple queries to be executed. 
To do this enter "allowMultiQueries=true" in the Additional JDBC parameters text box on the tMySQLConnection component.


Open the component properties of tMysqlRow .
Enter the multiple SQL queries separated by semicolon “;” in the Query text box
In this I have created a table with columns and insert a value in the column.
Don't forget to put " " at the starting of the query and ending of the query.

"Create table MysqlRow_demo
(Emp_ID int,
Emp_FirstName varchar(10),
Emp_LastName varchar(10),
Emp_Address varchar(20),
Emp_City varchar(10),
Emp_Pincode int);

INSERT INTO MysqlRow_demo VALUES(101,'John','Kumar','KR Puram','bangalore',569830);
INSERT INTO MysqlRow_demo VALUES(102,'Bren','Mahlotra','Mallesharam','Gujrat',672395);
INSERT INTO MysqlRow_demo VALUES(103,'Krishna','Tomar','Jayanagar','Pune',492365);"


At last Run the job you will see that table has been created in the database .


Wednesday, May 20, 2015

How to Activate and Deactivate Components and Subjobs in Talend !!

In this post I will show you how to Activate and Deactivate a single component as well as linked components and all the subjobs because sometimes we need to run some specific subjob by disabling the remaining components or sub jobs.
This will save you development time if you are going to test anything before deploying into the production.

Below is just an example how to enable or disable the components  or sub jobs.


If you want to dectivate a single component then right click on tFileList component and select Deactivate tFileList_1 . In this way you can deactivate any component in the job .

When a component or a subjob is deactivated, you are not able to create or modify links from or to it. at At runtime, no code is generated for the deactivated component or subjob.

In this way tFileList component is disable now we want to activate the component back then right click on it and select Activate tFileList_1. Component will become active.

You can also activate or deactivate the subjobs linked to a Start component. 
Here both the component tFileList and tFileInputDelimited are deactivated now if you want to activate both the components.So right click on tFileList and select Activate all linked Subjobs.
The component linked to tFileList will become active.


Here you can see both tFileList and tFileInputDelimited become active.
Now if you want to deactivate the whole job then right click on any component and click Deactivate the current Subjob.
 It will deactivate the whole subjob as shown in the screen.


Now if you want to activate the whole subjob then right click on any component and click Activate current Subjob.
All the component of the subjob get activated.


How to Import and Export Job in Talend !!


In this post will see how to import or export the jobs from talend studio, this will help if you want to share the job with someone else in your team or you want to take the backup and restore into some other Talend Studio project.

Below are the steps to do so.

How to Import Items or Import Jobs :-


When you want to import items or jobs of whole project follow the steps as shown below.

1. Go to the Repository Panel right click on Job Design and click Import items.

If you want to import any specific job then choose that job and right click and click on Import option.

2. In Select root directory field, browse to the directory where you want to import your Job.
Or if you want to Select archive file define the archive file for all selected items.
All the items which you want to import will be seen in the screen and click Finish button.


You can see see in your left side of Repository Panel under Job Design that your selected items are imported.

How to Export Items or Export Jobs 

When you want to export items or jobs of whole project in your directory then follow the steps as shown below.

1. Go to the Repository Panel right click on Job Design and click Export items.

2. In Select root directory field, browse to the directory where you want to store your exported Job.
Or if you want to Select archive file define the archive file where to compress the files for all selected items.


3. Click on Export Dependencies checkbox here all the items such as File Delimited ,Connections,Context,Routines which are part of these jobs will be selected along with these jobs.It will set and export all the dependencies along with Jobs you are exporting.

Exporting items from the Job Design means it will export all the jobs that are selected as shown in the screen we can deselect the job which we don't want.

4. Then click on Finish Button.

Now the other way by which you can Export item.
Here if you want to Export items of single job in your specified directory. 

1. Go to the Repository Panel right click on the Job which you want to export and click Export items.

2.Then browse the Select root directory and provide the path were your want your job to be exported.See in the below screen your job has been selected then click on Export Dependencies option so that all the items related to job are also exported in the directory.


3.Click on Finish button.
Now you can go to your directory and see your job has been exported.

Tuesday, May 19, 2015

How to Manage Version in Talend !!

When you create a Job in Talend Open Studio, by default its version is 0.1 where 0 stands for the major version and 1 for the minor version.

Management of versions in Talend can be done in so many ways.

Firstly close your Job if it is open on the design workspace. If it is open its properties will be read-only and we cannot modify it.
Go to the Repository Panel select your job right click on it and select Open another version option.

This pop window will be seen here tick the checkbox of Create new version and open now you can see that by default the version of the job is 0.1

Click on M button next to Version field the version will be 1.0
Here M is to increment the major version.


Click on button next to Version field the version will be 1.1
Here m is to increment the minor version.

Click which version you want either M or m.
Click the M button to increment the major version and the m button to increment the minor version.Click Finish to validate the modification.


This is the second way by this process also you can manage your version.

Go to the Repository Panel select your job right click on it and select Edit properties option.

Here in this window you can click either M or m button next to Version field to mange version in the job and click Finish button.

This is the third way by this process also you can manage your version.

You can also manage the version of each job together or one by one.

Go to the left side of the window and Open File option then select Edit Project properties.

Expand the General Setting click on Version Management .
By clicking on Job Design checkbox all the job will be selected .The selected items display in the Items list to the right along with their current version in the Version column and the new version set in the New Version column. 


If you want to make changes then:--
In the Options area, select Change all items to a fixed version check box to change the version of the selected jobs in the Items tab to the same fixed version.Click either M or m to manage the job version .By clicking Revert option you can undo the changes.
By clicking on Select all dependencies  you can update all of the items dependent on the selected job.By clicking on Select all subjobs you can update all of the subjobs dependent on the job at the same time.
By selecingt Update the version of each item check box you can increment each version of the jobs and change them manually.Then click on OK button.


Tuesday, May 12, 2015

How to use tRowGenerator component in Talend for generating random sample data !!

tRowGenerator generates as many rows and fields as needed and feeds each field with a random value.

Drag and drop the tRowGenerator and tLogRow component from palette to job design.
Then connect tRowGenerator by right clicking on it and select Row > Main and drag a line to tLogRow component.


Open the component properties of  tRowGenerator by double clicking on it.
The tRowGenerator Editor opens on a separate window consist of two parts:
  • Schema definition panel at the top of the window
  • Function definition and preview panel at the bottom of the window.
  • Click on [+] sign to add new column.
  • Set the Type of each columns.
  • Select function from “Function” tab on same columns grid by dropdown list or in the Function area, you can select the predefined routine/function if one of them corresponds to your needs.
  • To the change the values of Environment variables in the Schema definition panel in order to customize the function parameters.
    • Select the Function parameters tab in the second part of the window.
    • The Parameter area displays Customized parameter as function name there is no edit option.
    • In the Value area, type the value you want or by clicking ... button it open Expression Builder for editing you can add your custom logic.
    • Click on the Preview Button on the left side of upper part of the window.It will dispaly the details of only one Customer.
    • Set the “Number of Rows for RowGenerator” field to be 10. You can generate as many rows you want.

Now Click on Preview tab you can see that 10 rows are generated randomly.


Open the component properties of  tLogRow by double clicking on it and select option Table(print values in cell of a table). tLogRow displays the flow content on run job console.

Atlast Run the job.

You will see the below result all the data of Customer is generated randomly.

Starting job how_to_use_tRowGenerator_component at 14:43 12/05/2015.

[statistics] connecting to socket on port 3545
[statistics] connected
.----------+-------------------+-----------------+----------------+------------+-------------------+---------------|.
|                                        tLogRow_1                                                                                                   |
|=--------+-------------------+------------------+----------------+------------+-------------------+---------------|
|Cust_ID|Cust_FirstName|Cust_LastName|Cust_Address|Cust_City |Cust_PostalCode|RegisterDate|
|=--------+-------------------+------------------+----------------+------------+-------------------+---------------|
|1           |Woodrow           |Quincy              |4M9zwf         |Providence|691078               |20-02-2015  |
|2           |James                 |Harrison            |agcBva          |Sacramento|453808               |03-10-2013  |
|3           |Lyndon              |Quincy               |7olxAs          |Salem         |593135               |17-10-2014  |
|4           |Herbert              |Madison             |wi2TaM        |Lincoln       |466341              |28-12-2014  |
|5           |Herbert              |Harrison             |mInNN7        |Saint Paul   |477362              |29-03-2014  |
|6           |Harry                 |Taft                    |nT7CIC         |Honolulu     |701503             |08-12-2014  |
|7           |Andrew             |Buchanan           |a9IfVO          |Concord      |457610             |18-10-2013  |
|8           |Ulysses              |Johnson             |H9DlnY         |Harrisburg  |590078              |26-06-2013  |
|9           |John                   |Adams               |I4asX8           |Annapolis   |753132              |12-03-2014  |
|10         |Grover               |Taft                    |z4m4zH         |Pierre          |713152              |18-09-2014  |
'---------+-------------------+-------------------+----------------+-------------+-------------------+---------------|

[statistics] disconnected
Job how_to_use_tRowGenerator_component ended at 14:43 12/05/2015. [exit code=0]

Monday, May 11, 2015

How to Append File Using tFileList,tFileDelete and tJava component in Talend !!

In my previous post I have shown you how to append file using tFileList component here .In this what happens whenever we run the job it will append the data again and again in same file the records will be more than the records you want to append.Old data is there in file and new data will also append in the same file.

So in this post I will show you how to first delete the data then append the new data in the same file in this way what will happen is whenever you will run the job it will first delete the data then it will append the new data.

tFileList component iterates on files or folders of set directory and it retrieves a set of files or folders based on a filemask pattern.

In below job I have taken three input csv files(with same schema) they are as follows:--

Student_List1

student_id;student_name;student_branchid
101;Sameer Chowdhary;1
102;Aditya Tiwari;1
103;Gaurav Tiwari;1
104;Shashi Singh;1
105;Yogesh Mishra;5
106;Ankit Gupta;8
107;Mohit Sharma;9
108;Rajesh Soni;8
109;Rohit Sinha;1

Student_List2

student_id;student_name;student_branchid
110;Radha Singh;2
111;Richa Swankar;9
112;Santosh Tiwari;4
113;Gaurav Tiwari;1
114;Mohammad Singh;1
115;Prachi Mishra;5
116;Duddu Gupta;3
117;Mahi Sharma;9
118;Renuka Soni;6
119;Swati Sinha;1

Student_List3

student_id;student_name;student_branchid
120;Ravi Mahlotra;7

1. Select the component  tFileDelete,tFileList,tFileInputDelimited,tJava and  tFileOutputDelimited from the Palette and drag it into the job design window.

2. Connect tFileDelete component by Right click on the tFileDelete component, select Trigger > On SubJob Ok and drag it to the  tFileList.
Connect each componnet as shown in the screenshot below:--


3. Click on the tFileDelete component properties and then click on “FileName” tab select the path that contains the excel files by clicking on the “…” button.The path where you want to append all the file together. tFileList will give filename as output into a global variable which we can use as file name in tFileDelete. 


4. Click on the tFileList component properties and then click on “Directory” tab select the directory that contains the excel files by clicking on the “…” button.For example I have all three files in one folder named as Student_List.

In the "Files" column write the Filemask such as "student*" this means that the filename which starts from student that files will be only considered in tFileList .

5. Open the tJava_1 component properties and write in the "Code" section :--

context.FileName = ((String)globalMap.get("tFileList_1_CURRENT_FILEPATH"));

System.out.println(context.FileName);

Here I have created a context variable "FileName" it will get the path of the current file.
System.out.println this will print the names of files which I have used in my job.

6. Open the tFileInputDelimited component properties and set Property type  to “Built In”.
Under “File name / Stream” tab type tfilelist then press ctrl + space.
Select tFileList_1.CURRENT_FILEPATH.

7. Click on Edit Schema to provide the schema of the files. In the Popup window add three columns as shown in screenshot below.

8. Open the component properties of tFileOutputDelimited :--

Write the File Name by clicking .... button where you want to store your single csv file.
Tick append check box to append the data to existing file instead of creating new file every time.

Note: While running job for multiple files, All input files data will be appended to single file with this append check box.
Check include header so that single file will appear with header column.


9. Open the tJava_2 component properties and write in the "Code" section :--

context.NumberOfRows=((Integer)globalMap.get("tFileInputDelimited_1_NB_LINE"));
System.out.println(context.NumberOfRows);

Here I have created a context variable "NumberOfRows" it will get the number of lines in the input file.
System.out.println this will print the number of rows of all the files.

Make sure you have multiple CSV files in your directory.
10. Click the “Run” button.
Now you will see all your files are processed one by one and loaded into the Single File.


Append_StudentList.csv(in excel format)
student_id;student_name;student_branchid
101;Sameer Chowdhary;1
102;Aditya Tiwari;1
103;Gaurav Tiwari;1
104;Shashi Singh;1
105;Yogesh Mishra;5
106;Ankit Gupta;8
107;Mohit Sharma;9
108;Rajesh Soni;8
109;Rohit Sinha;1
110;Radha Singh;2
111;Richa Swankar;9
112;Santosh Tiwari;4
113;Gaurav Tiwari;1
114;Mohammad Singh;1
115;Prachi Mishra;5
116;Duddu Gupta;3
117;Mahi Sharma;9
118;Renuka Soni;6
119;Swati Sinha;1
120;Ravi Mahlotra;7

This result is shown in your Run tab
Starting job how_to_append_file_using_tFileList at 15:34 11/05/2015.

[statistics] connecting to socket on port 3408
[statistics] connected
C:\Users\mini\Documents\Talend_Tutorials\Student_List\studentList1.csv
9
C:\Users\mini\Documents\Talend_Tutorials\Student_List\studentList2.csv
10
C:\Users\mini\Documents\Talend_Tutorials\Student_List\studentList3.csv
1
[statistics] disconnected
Job how_to_append_file_using_tFileList ended at 15:34 11/05/2015. [exit code=0]

Here you can see that first all the files append in single file then the file names and how many rows are there in each file are displayed using tJava component.

First file name StudentList1.csv number of rows 9
Second file name StudentList2.csv number of rows 10
Third file name StudentList3.csv number of rows 1

How to Append Multiple File Using tFileList component !!

tFileList component iterates on files or folders of set directory and it retrieves a set of files or folders based on a filemask pattern.

In below job I have taken three input csv files(with same schema) they are as follows:--

Student_List1

student_id;student_name;student_branchid
101;Sameer Chowdhary;1
102;Aditya Tiwari;1
103;Gaurav Tiwari;1
104;Shashi Singh;1
105;Yogesh Mishra;5
106;Ankit Gupta;8
107;Mohit Sharma;9
108;Rajesh Soni;8
109;Rohit Sinha;1

Student_List2

student_id;student_name;student_branchid
110;Radha Singh;2
111;Richa Swankar;9
112;Santosh Tiwari;4
113;Gaurav Tiwari;1
114;Mohammad Singh;1
115;Prachi Mishra;5
116;Duddu Gupta;3
117;Mahi Sharma;9
118;Renuka Soni;6
119;Swati Sinha;1

Student_List3

student_id;student_name;student_branchid
120;Ravi Mahlotra;7

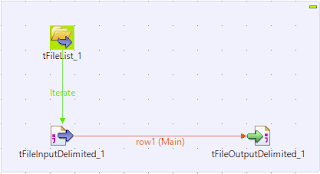
1. Select the component tFileList and tFileInputDelimited and  tFileOutputDelimited from the Palette and drag it into the job design window.

2. Connect tFileList component by Right click on the tFileList component, select Run -> Iterate
Connect this “Iterate” link to the tFileInputDelimited component.Then connect 
 tFileInputDelimited to by right click and selecr Row > Main and drag the line to tFileOutputDelimited component.


3. Click on the tFileList component properties and then click on “Directory” tab select the directory that contains the excel files by clicking on the “…” button.For example I have all three files in one folder named as Student_List.
In the "Files" column write the Filemask such as "student*" this means that the filename which starts from student that files will be only considered in tFileList .

4. Open the tFileInputDelimited component properties and set Property type  to “Built In”.
Under “File name / Stream” tab type tfilelist then press ctrl + space.
Select tFileList_1.CURRENT_FILEPATH.


5. Click on Edit Schema to provide the schema of the files. In the Popup window add three columns as shown in screenshot below.

6. Open the componnet properties of tFileOutputDelimited :--

Write the File Name by clicking .... button where you want to store your single csv file.
Tick append check box to append the data to existing file instead of creating new file every time.

Note: While running job for multiple files, All input files data will be appended to single file with this append check box.
Check include header so that single file will appear with header column.


Make sure you have multiple CSV files in your directory.
7. Click the “Run” button.
Now you will see all your files are processed one by one and loaded into the Single File.


Append_StudentList.csvstudent_id;student_name;student_branchid
101;Sameer Chowdhary;1
102;Aditya Tiwari;1
103;Gaurav Tiwari;1
104;Shashi Singh;1
105;Yogesh Mishra;5
106;Ankit Gupta;8
107;Mohit Sharma;9
108;Rajesh Soni;8
109;Rohit Sinha;1
110;Radha Singh;2
111;Richa Swankar;9
112;Santosh Tiwari;4
113;Gaurav Tiwari;1
114;Mohammad Singh;1
115;Prachi Mishra;5
116;Duddu Gupta;3
117;Mahi Sharma;9
118;Renuka Soni;6
119;Swati Sinha;1
120;Ravi Mahlotra;7

Result would be like above in excel format.

Friday, May 8, 2015

How to Append Multiple Files into Single File in Talend Studio !!

In this tutorial I will show you how to append multiple csv files of the same format into a single csv file.
Problem Statement :- Suppose you are getting same input format files for different countries on daily basis and now you want to consolidate or append all the countries file data into one input file. 

In below job I have taken three input csv files(with same schema) they are as follows:--

Student_List1

student_id;student_name;student_branchid
101;Sameer Chowdhary;1
102;Aditya Tiwari;1
103;Gaurav Tiwari;1
104;Shashi Singh;1
105;Yogesh Mishra;5
106;Ankit Gupta;8
107;Mohit Sharma;9
108;Rajesh Soni;8
109;Rohit Sinha;1

Student_List2

student_id;student_name;student_branchid
110;Radha Singh;2
111;Richa Swankar;9
112;Santosh Tiwari;4
113;Gaurav Tiwari;1
114;Mohammad Singh;1
115;Prachi Mishra;5
116;Duddu Gupta;3
117;Mahi Sharma;9
118;Renuka Soni;6
119;Swati Sinha;1

Student_List3

student_id;student_name;student_branchid
120;Ravi Mahlotra;7

1.So firstly create a new job by right clicking  on Job Designs in the Repository window and select “Create job”.
2.Create a schema of this three files by going to Metadata > FileDelimited > Create FileDelimited.
3.Drag and drop created metadata of all three files to the job design one by one then select tFileInputDelimited option from the pop window.
4.Drag and drop tFileOutputDelimited from the palette.
5.Connect each component as shown in the screenshot.


6. Double click on student_list1(tFileInputDelimited_1) component to open the Basic settings properties .The screen would look like below:--
And do same process for other two tFileInputDelimited.


7. Open the componnet properties of tFileOutputDelimited :--
8. Write the File Name by clicking .... button where you want to store your single csv file.
9. Tick append check box to append the data to existing file instead of creating new file every time.
Note: While running job for multiple files, All input files data will be appended to single file with this append check box.
10. Check include header so that single file will appear with header column.

And do same process for other tFileOutputDelimited but note that you provide same File Name because we have to append all three files into single file.


Now our job design is complete and we just need to run the job to load all three files into single csv file.

Wednesday, May 6, 2015

How to use tJavaRow component in Talend !!

The tJavaRow component allows Java logic to be performed for every record within a flow.

tJavaRow is called for every row processed, it is possible to create a global variable for a row that can be referenced by all components in a flow. This can be useful when pre and post field values are required for comparison purposes later in the flow.

Here I have used Employee Table as FileInputDelimited.

Employee_ID,Last_Name,First_Name,Birth_Date
1,Lasson,Samuel,7/2/1969
2,Ortega,lee,9/19/1928
3,Zant,Thi,3/23/1938
4,Cohen,John,4/21/1927
5,Park,Umar,12/8/1968
6,Knipp,Troy,2/19/1952
7,Lunberg,Greg,8/30/1963
8,Brown,Sami,9/19/1958
9,Barnhill,Pascal,7/2/1969
10,Rose,Aaron,2/13/1956

1. Add FileInputDelimited , tJavaRow and tLogRow components from the palette.
2. Link the flows as shown in the following screenshot:--


3. Open the Edit schema button on tJavaRow component and you will see that there are no fields in the output.
 Highlight Employee_ID,Last_Name,First_Name,Birth_Date and click on the single arrow. 
4. Use the + button to add new columns Full_Name(String),First_Name_Length (Integer), Last_Name_Length(Integer) so that the schema looks like the following:
5. Close the schema by pressing OK button.


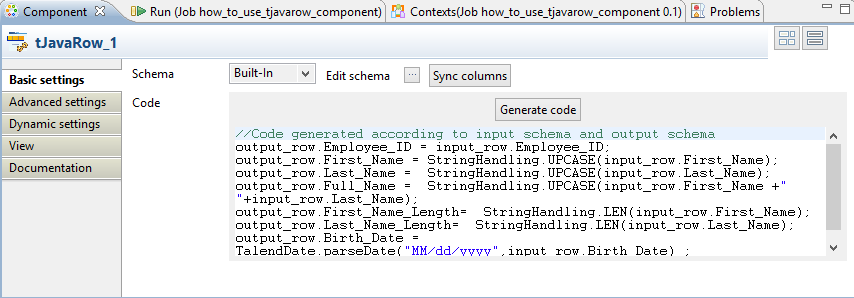
6. Then press the Generate code button in the main tJavaRow screen. The generated code will be as follows: 
//Code generated according to input schema and output schema is:--
output_row.Employee_ID = input_row.Employee_ID;
output_row.First_Name = input_row.First_Name;
output_row.Last_Name = input_row.Last_Name;
output_row.Full_Name = input_row.Birth_Date;
output_row.First_Name_Length = input_row.Birth_Date;
output_row.Last_Name_Length = input_row.Birth_Date;
output_row.Birth_Date = input_row.Birth_Date;


7. Replace the Generated code with this code:--
output_row.Employee_ID = input_row.Employee_ID;
output_row.First_Name = StringHandling.UPCASE(input_row.First_Name);
output_row.Last_Name =  StringHandling.UPCASE(input_row.Last_Name);
output_row.Full_Name =  StringHandling.UPCASE(input_row.First_Name +" "+input_row.Last_Name);
output_row.First_Name_Length=  StringHandling.LEN(input_row.First_Name);
output_row.Last_Name_Length=  StringHandling.LEN(input_row.Last_Name);
output_row.Birth_Date = TalendDate.parseDate("MM/dd/yyyy",input_row.Birth_Date) ;

8. In tLogRow component select Table option to display the result.

9. Run the job.

Starting job how_to_use_tjavarow_component at 15:02 06/05/2015.

[statistics] connecting to socket on port 3689
[statistics] connected
.-----------+----------+---------+---------------+-----------------+----------------+----------+--------------|.
|                                          tLogRow_1                                                                                          |
|=----------+----------+---------+---------------+-----------------+----------------+----------+-------------|
|Employee_ID|First_Name|Last_Name|Full_Name             |First_Name|Last_Name|Birth_        |
                                                                                              |_Length      |_Length     |Date           |
|=---------------+-------------+------------+-------------+-----------------------+-----------------------+---|
|1                     |SAMUEL   |LASSON  |SAMUEL LASSON|6                |6                |07/02/1969|
|2                     |LEE            |ORTEGA  |LEE ORTEGA       |3                 |6                |09/19/1928|
|3                     |THI             |ZANT       |THI ZANT             |3                 |4               |03/23/1938|
|4                     |JOHN         |COHEN    |JOHN COHEN       |4                 |5               |04/21/1927|
|5                     UMAR        |PARK       |UMAR PARK         |4                |4               |12/08/1968|
|6                     |TROY        |KNIPP      |TROY KNIPP          |4                |5               |02/19/1952|
|7                     |GREG        |LUNBERG|GREG LUNBERG  |4               |7               |08/30/1963|
|8                     |SAMI         |BROWN    |SAMI BROWN      |4                |5               |09/19/1958|
|9                     |PASCAL    |BARNHILL|PASCAL BARNHILL|6          |8               |07/02/1969|
|10                   |AARON     |ROSE         |AARON ROSE     |5                 |4               |02/13/1956|
'-----------+----------+---------+---------------+-----------------+----------------+-----------+-------------

[statistics] disconnected
Job how_to_use_tjavarow_component ended at 15:02 06/05/2015. [exit code=0]

Here you can see in the result that First_Name and Last_Name are in uppercase .
In Full_Name we have concatenated the First_Name and Last_Name with space in between.
 First_Name_Length and Last_Name_Length provide the length of  names.
In Birth_Date we have given it in date format.

How it works… The tJavaRow component is much like a 1 input to 1 output tMap, in that input columns can be ignored and new columns can be added to the output. Once the output fields have been defined the Generate code button will create a Java mapping for every output field. If the names are the same, then it will map correctly. If input fields are not found or are named differently, then it will automatically map the field in the same position in the input or the last known input field, so be careful when using this option if you have removed fields. In some cases, it is best to propagate all fields, generate the mappings and then remove unwanted fields and mappings.
Also, be aware that the Generated Code option will remove all code in the window. If you have code that you wish to keep, then ensure that you copy it into a text editor before regenerating the code.

How to tJava component in Talend !!

The tJava component allows one-off logic to be added to a job. Common uses of tJava include setting global or context variables prior to the main data processing stages and printing logging messages.

Here I have used Employee Table as FileInputDelimited.

Employee_ID,Last_Name,First_Name,Birth_Date
1,Lasson,Samuel,7/2/1969
2,Ortega,lee,9/19/1928
3,Zant,Thi,3/23/1938
4,Cohen,John,4/21/1927
5,Park,Umar,12/8/1968
6,Knipp,Troy,2/19/1952
7,Lunberg,Greg,8/30/1963
8,Brown,Sami,9/19/1958
9,Barnhill,Pascal,7/2/1969
10,Rose,Aaron,2/13/1956

1. Drag the following components from the palette and drop it to the design work space. And connect each of them as shown in the screenshot.

As per the below screen shot you can search for the required components used in the job and use same connection between the components to get the desired output as per mentioned below in output section. There can be many ways to do the same things and this is one of them.


2. Open the tJava_1 component Basic settings properties.
3. Type the following code:
System.out.println("Executing job "+jobName+" at "+TalendDate. getDate("YYYY-MM-dd HH:mm:ss"));
4. Open the tJava_2 component.
5. Type the following code:
context.NumberOfRows= ((Integer)globalMap.get("tFileInputDelimited_1_NB_LINE"));

System.out.println("Total number of rows in input file - " + context.NumberOfRows);

Here we have used the context variable which I have created in my previous post how to create a context .Context variable used is NumberOfRows.


7. In tLogRow component select Table option to display the result in table format.
6. Run the job. You will see that message is printed showing the job name and the  date and time of execution then Employee data and at last total number of rows in input file.

Starting job how_to_use_tjava_component at 14:37 06/05/2015.

[statistics] connecting to socket on port 3568
[statistics] connected
Executing job how_to_use_tjava_component at 2015-05-06 14:37:10
.-----------+---------+----------+----------+-------------|.
|                 tLogRow_1                                            |
|=----------+---------+----------+---------+------------- |
|Employee_ID|Last_Name|First_Name|Birth_Date|
|=---------------+-----------+-------------+--------------|
|1                     |Lasson       |Samuel       |7/2/1969   |
|2                     |Ortega        |lee              |9/19/1928 |
|3                     |Zant           |Thi              |3/23/1938 |
|4                     |Cohen        |John            |4/21/1927 |
|5                     |Park           |Umar           |12/8/1968 |
|6                     |Knipp        |Troy            |2/19/1952 |
|7                     |Lunberg     |Greg           |8/30/1963 |
|8                     |Brown        |Sami           |9/19/1958 |
|9                     |Barnhill      |Pascal         |7/2/1969  |
|10                   |Rose           |Aaron         |2/13/1956 |
'-----------------+-------------+--------------+-----------|

Total number of rows in input file - 10
[statistics] disconnected
Job how_to_use_tjava_component ended at 14:37 06/05/2015. [exit code=0]

Tuesday, May 5, 2015

How to Create Context Group in Talend !!

In this post will see how to use context which will

A context group is a set of (usually) related context variables for use within a project.
The steps for creating a context group are as follows:

1. Open the metadata panel, and right-click on the context section.
2. Select the Create context group option.

3. Name the new group such as JobData.
4. Click on the Next button, and you will see the main context variable panel.
                             
                                           
5. Click on + to add a new variable and type in Name such as FileName,Input_FilePath,NumberofRows,Output_FilePath

6. Set the type of variables

                                     
7. Here one variable is of type Directory so for this click on the Values as a table tab, and click on the Default column for Input_FilePath. Click on the … icon.
 8. This will open a directory navigation window, so navigate to the Input_FilePath directory, and click on Finish.
                                       

9.Then click on the Value as tree tab and expand your variable definition. Note that the default context will be called default. To change this name and/or to add other contexts, click on the context icon on the top right hand corner.Now you will see your new/altered context show up in the main dialog. 

10.Define if you want a prompt and prompt text for each variable/context combination. Finally define a value.The Configure Contexts dialog allows you to edit existing contexts or to add new ones. Once you defined your contexts, click OK.

How to use repository context variables within jobs

Once you have created the context variables it is defined in the repository, you can easily add them to your job:
Open the job and click on the Context tab. Then click on the Repository icon in the left corner of the screen.

This pop window will appear select the Context Variables which you want to use in your job and click OK.


Now you can see the variables which you have selected is added in the context tab. Note that the variable will be available with the context prefix in the Script code column.


Creating Context using Database Connection

We will take existing database connection which we have made in database connection post named as my_db.Go to Metadata > Db Connection > my_db right click on it and select Edit connection option then click Next.


In this window click Export as context.


After you've clicked the Export as context button you’ll see the Create/Edit context group screen. Enter a name, purpose and description and click Next. 
Now you’ll see all the context variables that belong to this context group. If you want to change their names you can simply click on them and you can change. 


In the Values as table tab you can edit the values of the context variables by simply clicking the value and changing it. To add a new context, click the context symbol in the upper right corner.

The window that pops up is used to Configure Contexts. To rename the Default context, select it, click Edit, enter Development and click OkTo create a new context, click New, enter the name of the context, in for example Production, and click OK.

Here you will see that an extra column Production appeared. And click Finish.

Here we have exported the connection as a context, now we can use it in a job. Create a new job, use the connection that has been exported as a context .